

K3s Architecture: Kubernetes Fundamentals
by Nitturu Baba, System Analyst
You don't need to know anything about Kubernetes to read this. We'll build it up from the actual problem it solves, then work our way down to how K3s (a lightweight, single-binary distribution of Kubernetes) implements it. This is part one of a three-part series: it covers the fundamentals and a complete example cluster, with upcoming parts diving deep into the control plane and worker node architecture.
Why Kubernetes?
Say you've built a web app, packaged it into a container with Docker, and it runs great on your laptop. Now you need to run it in production, reliably, for real users. A few things immediately become your problem:
Your container needs to run on some machine, somewhere. If that machine crashes, or the container itself crashes, something needs to notice and start it again. If traffic grows, you need more copies of it running, spread across more machines, with a way to route requests to whichever copy is healthy. If you deploy a new version, you want it rolled out without dropping requests, and rolled back automatically if it's broken.
You could do all of this by hand: SSH into servers, run docker run, write a cron job that checks if things are still alive, manually update a load balancer's config every time something changes. People genuinely used to do this. It works until it doesn't, usually around 2am, usually on the day nothing was supposed to go wrong.
Kubernetes exists to take that whole job away from you. You describe what you want ("run three copies of this container, keep them healthy, expose them on this address"), and Kubernetes continuously works to make reality match that description, on its own, across however many machines you give it.
What Is Kubernetes?
Kubernetes is a system for managing containers across a group of machines. You give it a description of what you want running, and it figures out where to run it, keeps it running, and fixes things when they drift from what you asked for.
A few words come up constantly, so let's define them plainly before going further:
- Container: a packaged application plus everything it needs to run, isolated from the rest of the machine.
- Node: a single machine, physical or virtual, that's part of the cluster.
- Cluster: the whole group of nodes working together, managed as one unit.
- Pod: the smallest thing Kubernetes actually runs. Usually just one container, sometimes a couple that need to live together.
The Basic Shape of a Kubernetes Cluster
Every Kubernetes cluster splits its machines into two roles.
Some machines form the control plane: they don't run your application at all, their whole job is deciding what should happen and remembering the current state of cluster. The rest are worker nodes: this is where your containers actually run.
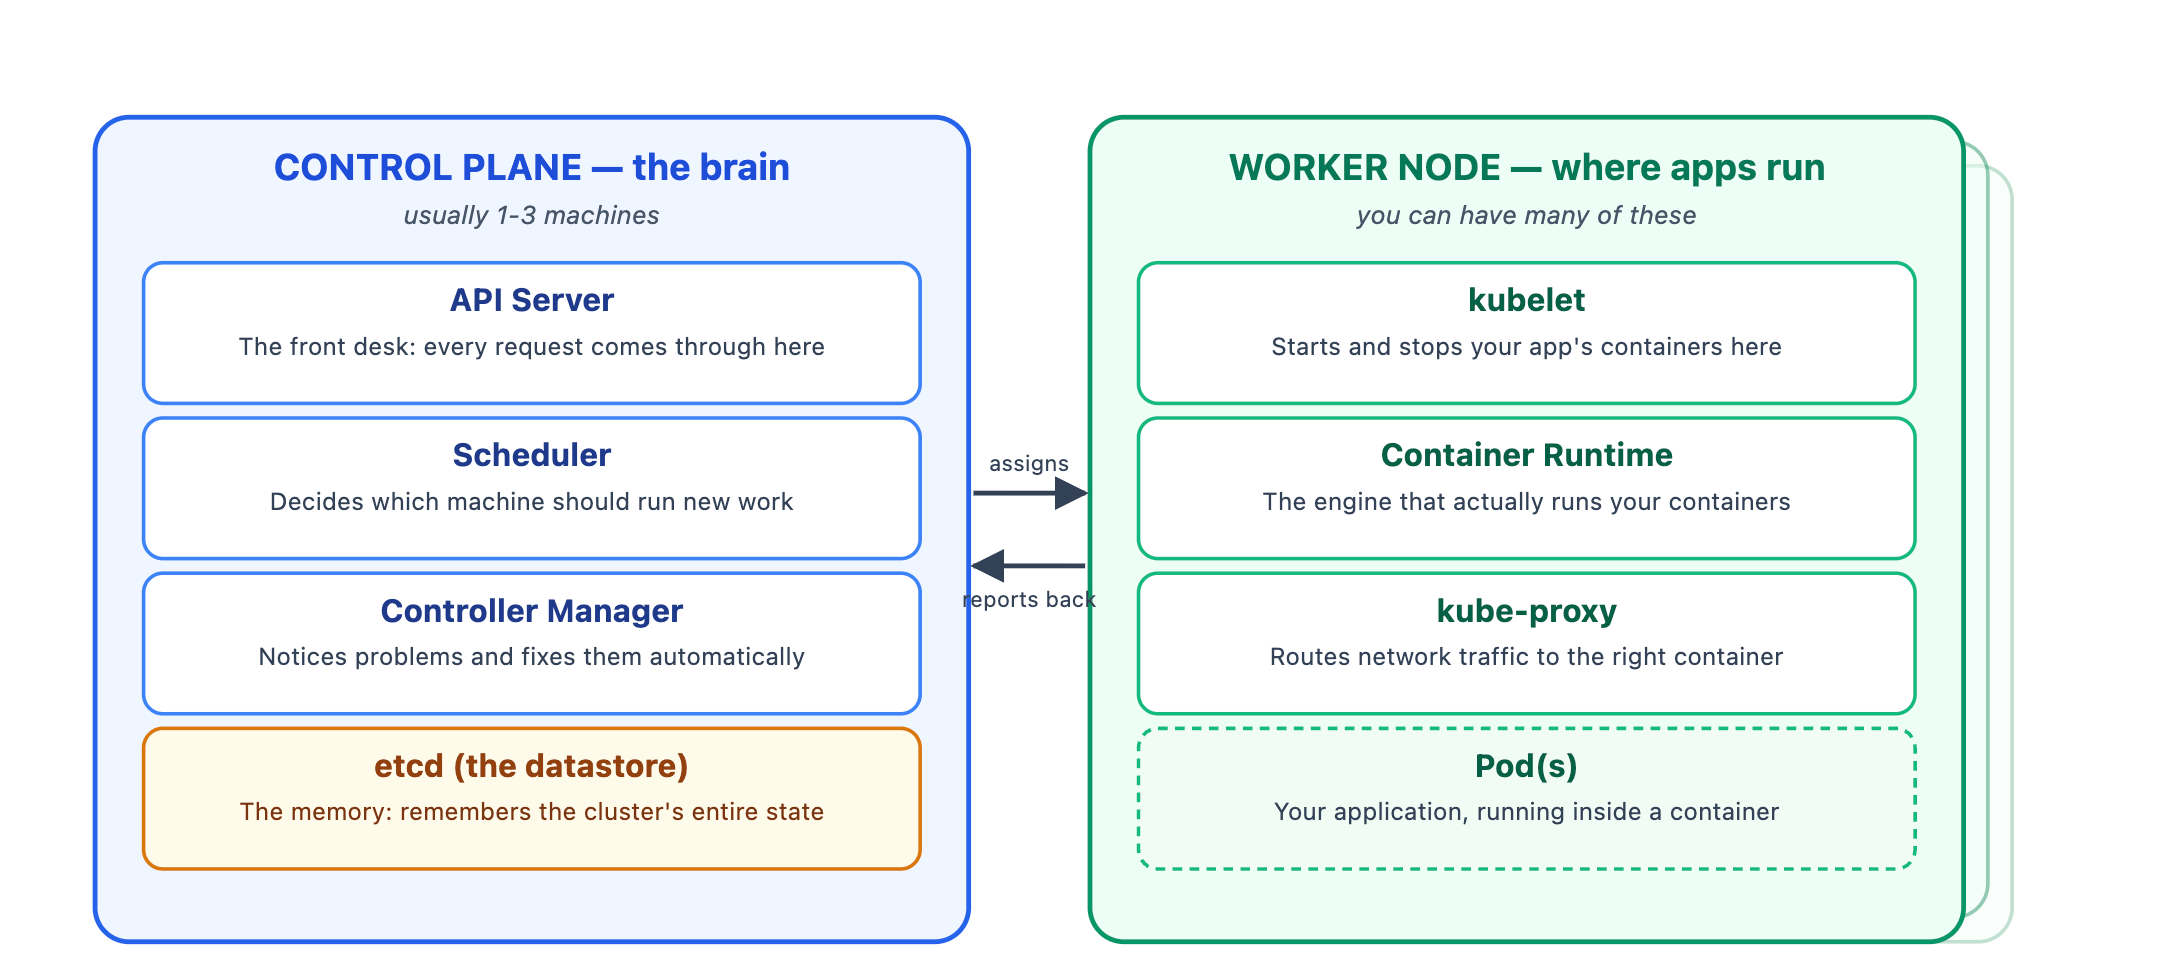
Four things live in the control plane. The API Server is the front desk: literally every request, whether from you typing a command or from another internal component, goes through it. The Scheduler decides which worker node should run a new piece of work. The Controller Manager is a set of loops constantly comparing "what's supposed to be running" against "what's actually running" and fixing the difference. And etcd is where all of that state is written down and remembered.
On each worker node, three things run. The kubelet is the one starting and stopping containers on that machine. The container runtime is the lower-level engine that does the mechanical work of running a container. And kube-proxy makes sure network traffic reaches the right container, even as containers get created, destroyed, and moved around.
If you understand that one picture, you already understand the shape of every Kubernetes cluster that exists. Part two goes deep on every control-plane piece; part three goes deep on every worker-node piece. This post stays at the level of "what does the whole thing look like and do."
Why K3s?
In standard Kubernetes, almost every piece you just saw (the database, the scheduler, the API server, and the node agents) is a separate program you have to install, configure, and maintain across your machines. On top of that, basic essentials like internal networking, routing web traffic, and storage aren't included out of the box, leaving you to research and stitch together third-party tools yourself. That is a ton of operational complexity to take on, especially if all you wanted was to run a few containers reliably.
K3s takes the exact same Kubernetes and repackages it to remove that weight. It compiles the control-plane processes into one binary, swaps the mandatory etcd requirement for embedded SQLite by default, and ships the commonly needed extras (DNS, ingress, a load balancer, storage) pre-installed. The result is a single binary under 70MB that runs comfortably on a Raspberry Pi and still passes the full Cloud Native Computing Foundation (CNCF) Kubernetes conformance suite. It isn't a "Kubernetes-like" tool. It's real Kubernetes, just packaged sensibly.
What Is K3s?
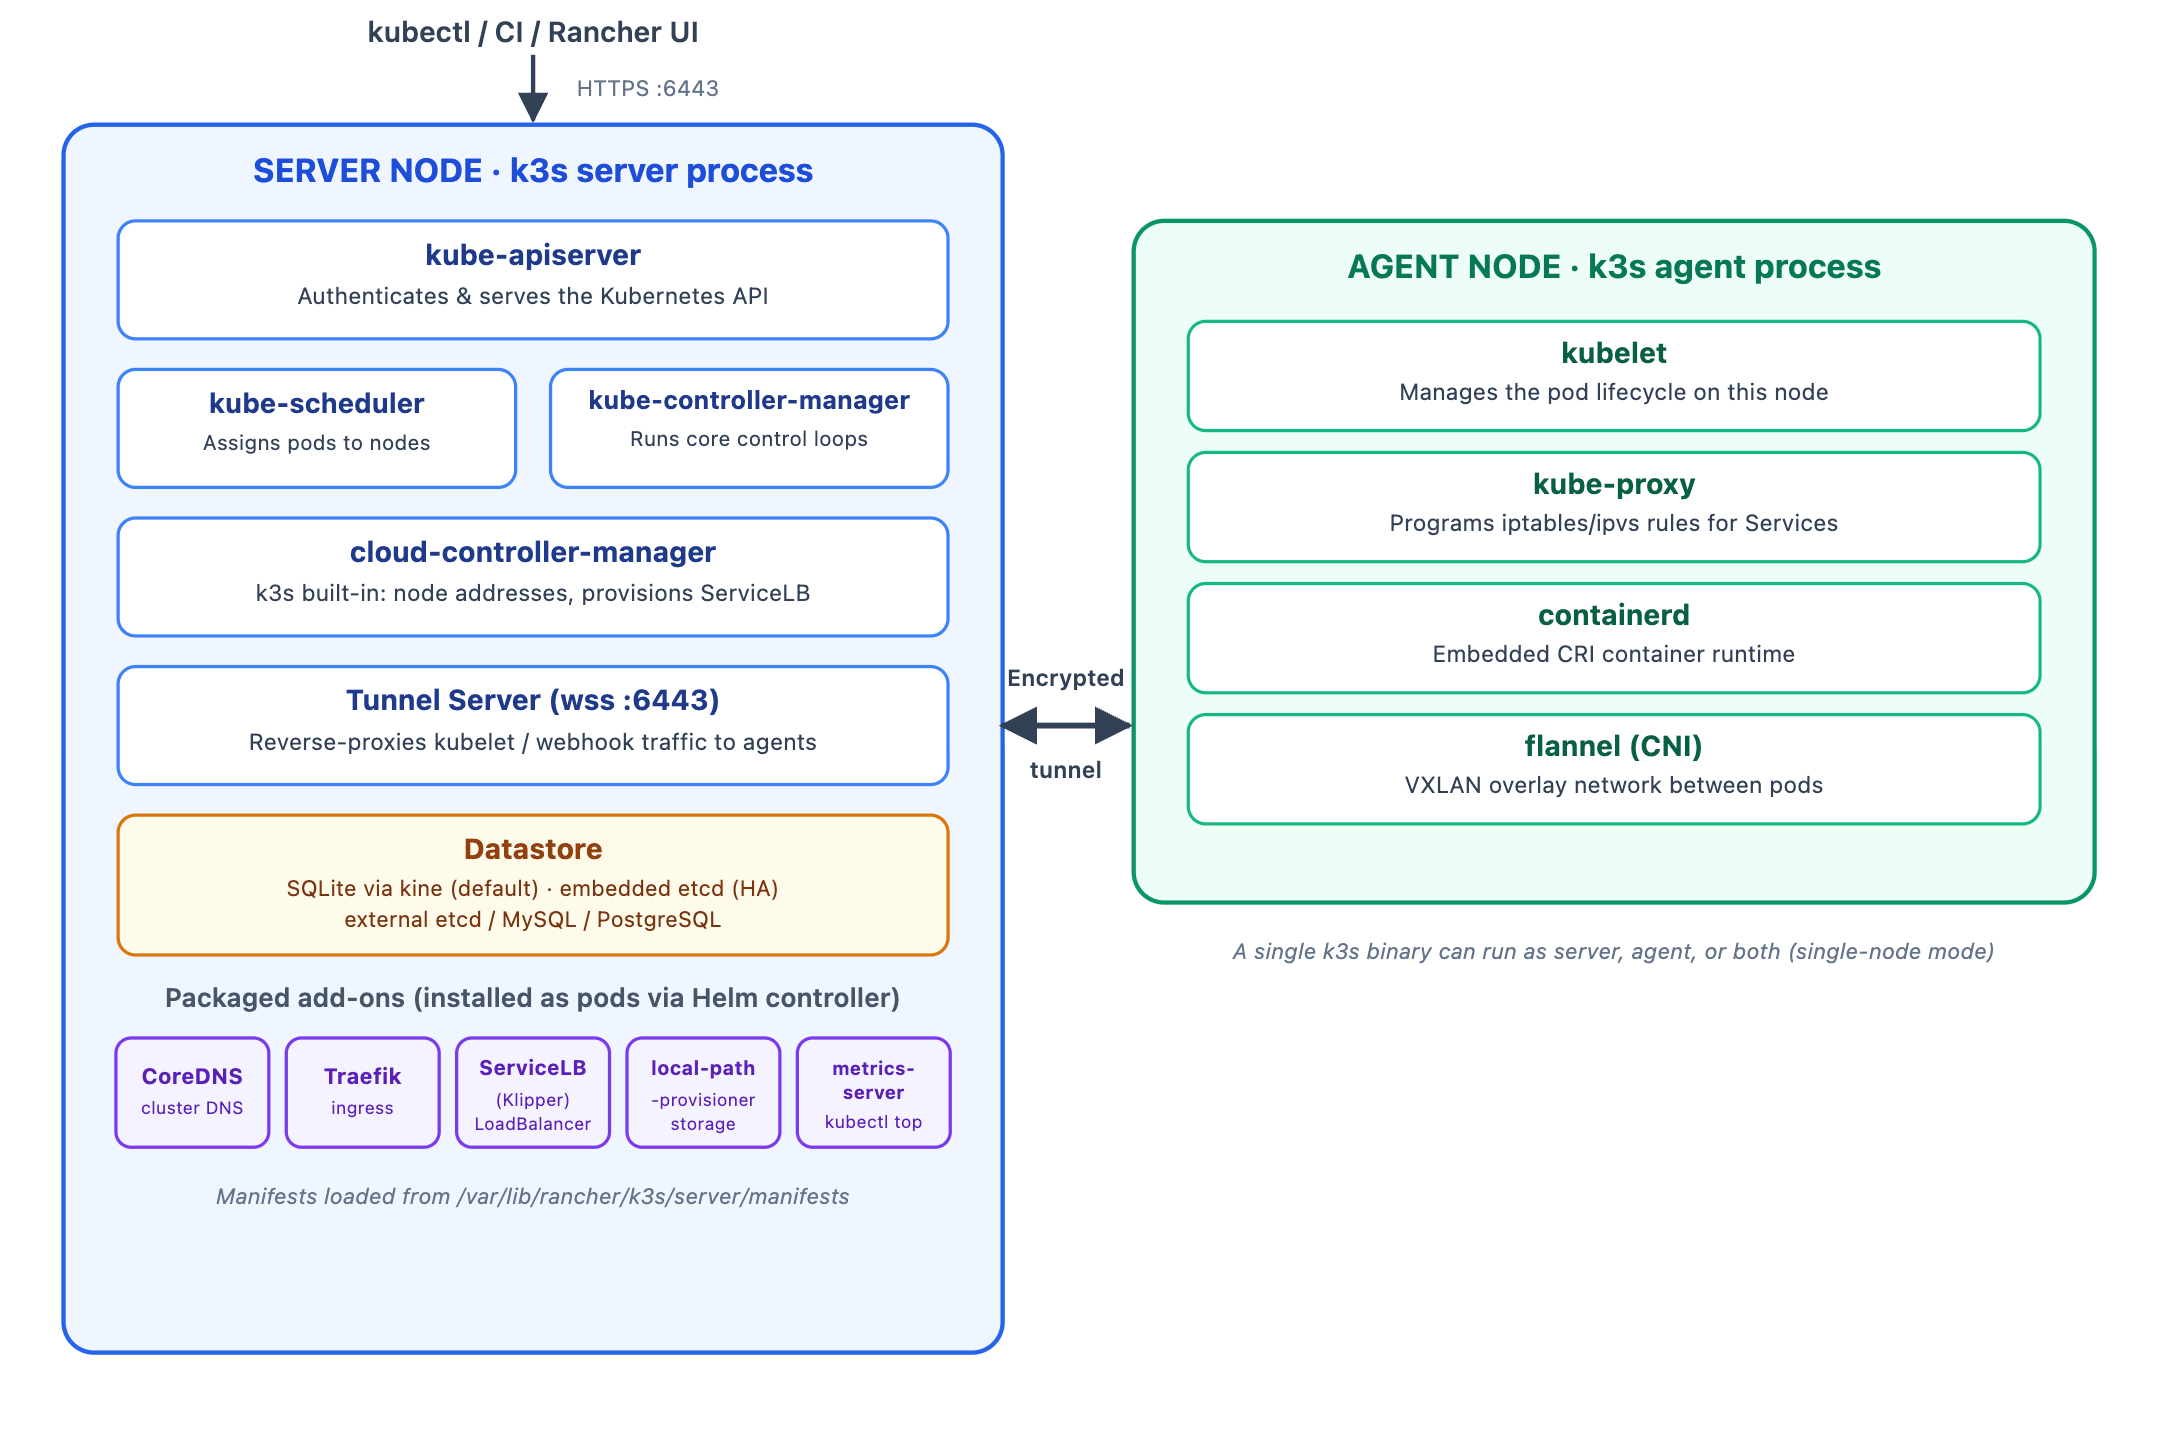
K3s is a CNCF-certified Kubernetes distribution that ships as one Go binary containing every control-plane process, a built-in container runtime, a built-in networking plugin, and a set of ready-to-use add-ons. It can run as a full multi-machine cluster, or as a single command on a single laptop.
Server and Agent Nodes
K3s has exactly two node roles, and they map directly onto the control plane / worker node split from earlier:
- Server nodes run
k3s server: the full control plane plus the datastore, plus everything a worker node needs. - Agent nodes run
k3s agent: just the worker-side pieces, kubelet, kube-proxy, containerd, and the CNI plugin.
A single node can be both. k3s server on its own is a complete, working single-node cluster, which is why K3s is so popular for local development, CI runners, and edge devices that only need one box.
Here's the full picture, with every component in its place.
A Running Example
To make the rest of this series concrete, consider a typical web application: a frontend with 2 replicas (so the UI survives one crashing, and can handle a bit of traffic) and a backend with 3 replicas (handling the heavier API work). We'll use this setup (2 frontend containers and 3 backend containers) as our running example throughout this series.
Seeing It as a Real Cluster
Let's deploy this application onto an actual K3s cluster: 1 server node acting as the control plane, and 3 agent nodes to run the work. You don't tell Kubernetes which specific node should run which pod; you just specify "I want 2 frontend replicas and 3 backend replicas", and it handles placement automatically.
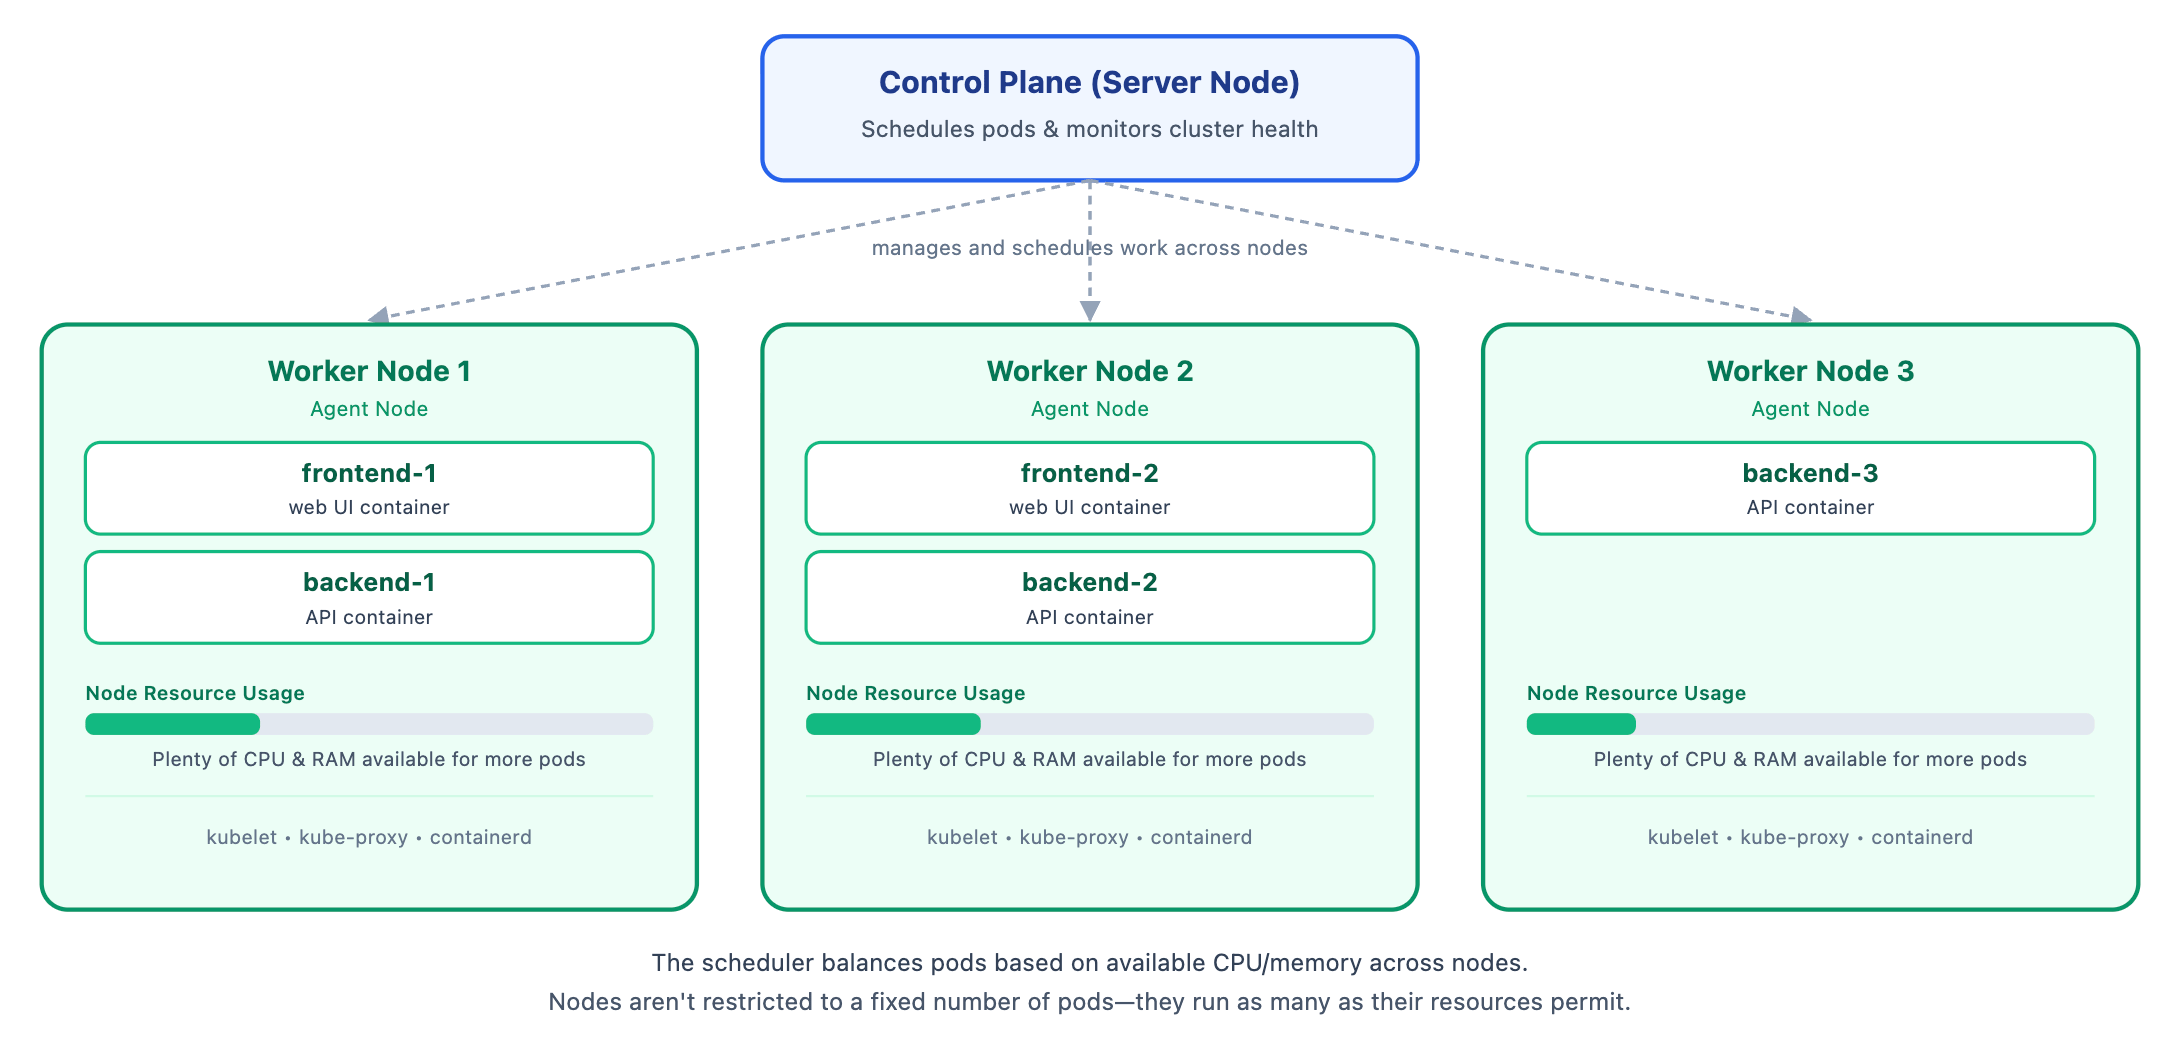
The control plane's scheduler evaluates the cluster and spreads the pods across the available worker nodes. Rather than dumping every container onto a single machine, it distributes them so that losing one node won't take down your entire application. Worker nodes aren't limited to a fixed number of pods, nodes can comfortably run many pods as long as they have sufficient CPU and memory.
What Happens When a Pod Dies
This is the part that makes Kubernetes worth the complexity: it doesn't just place your pods once and walk away, it keeps checking, forever, that reality still matches what you asked for.
Say Worker Node 2 has a bad moment and backend-2 crashes.
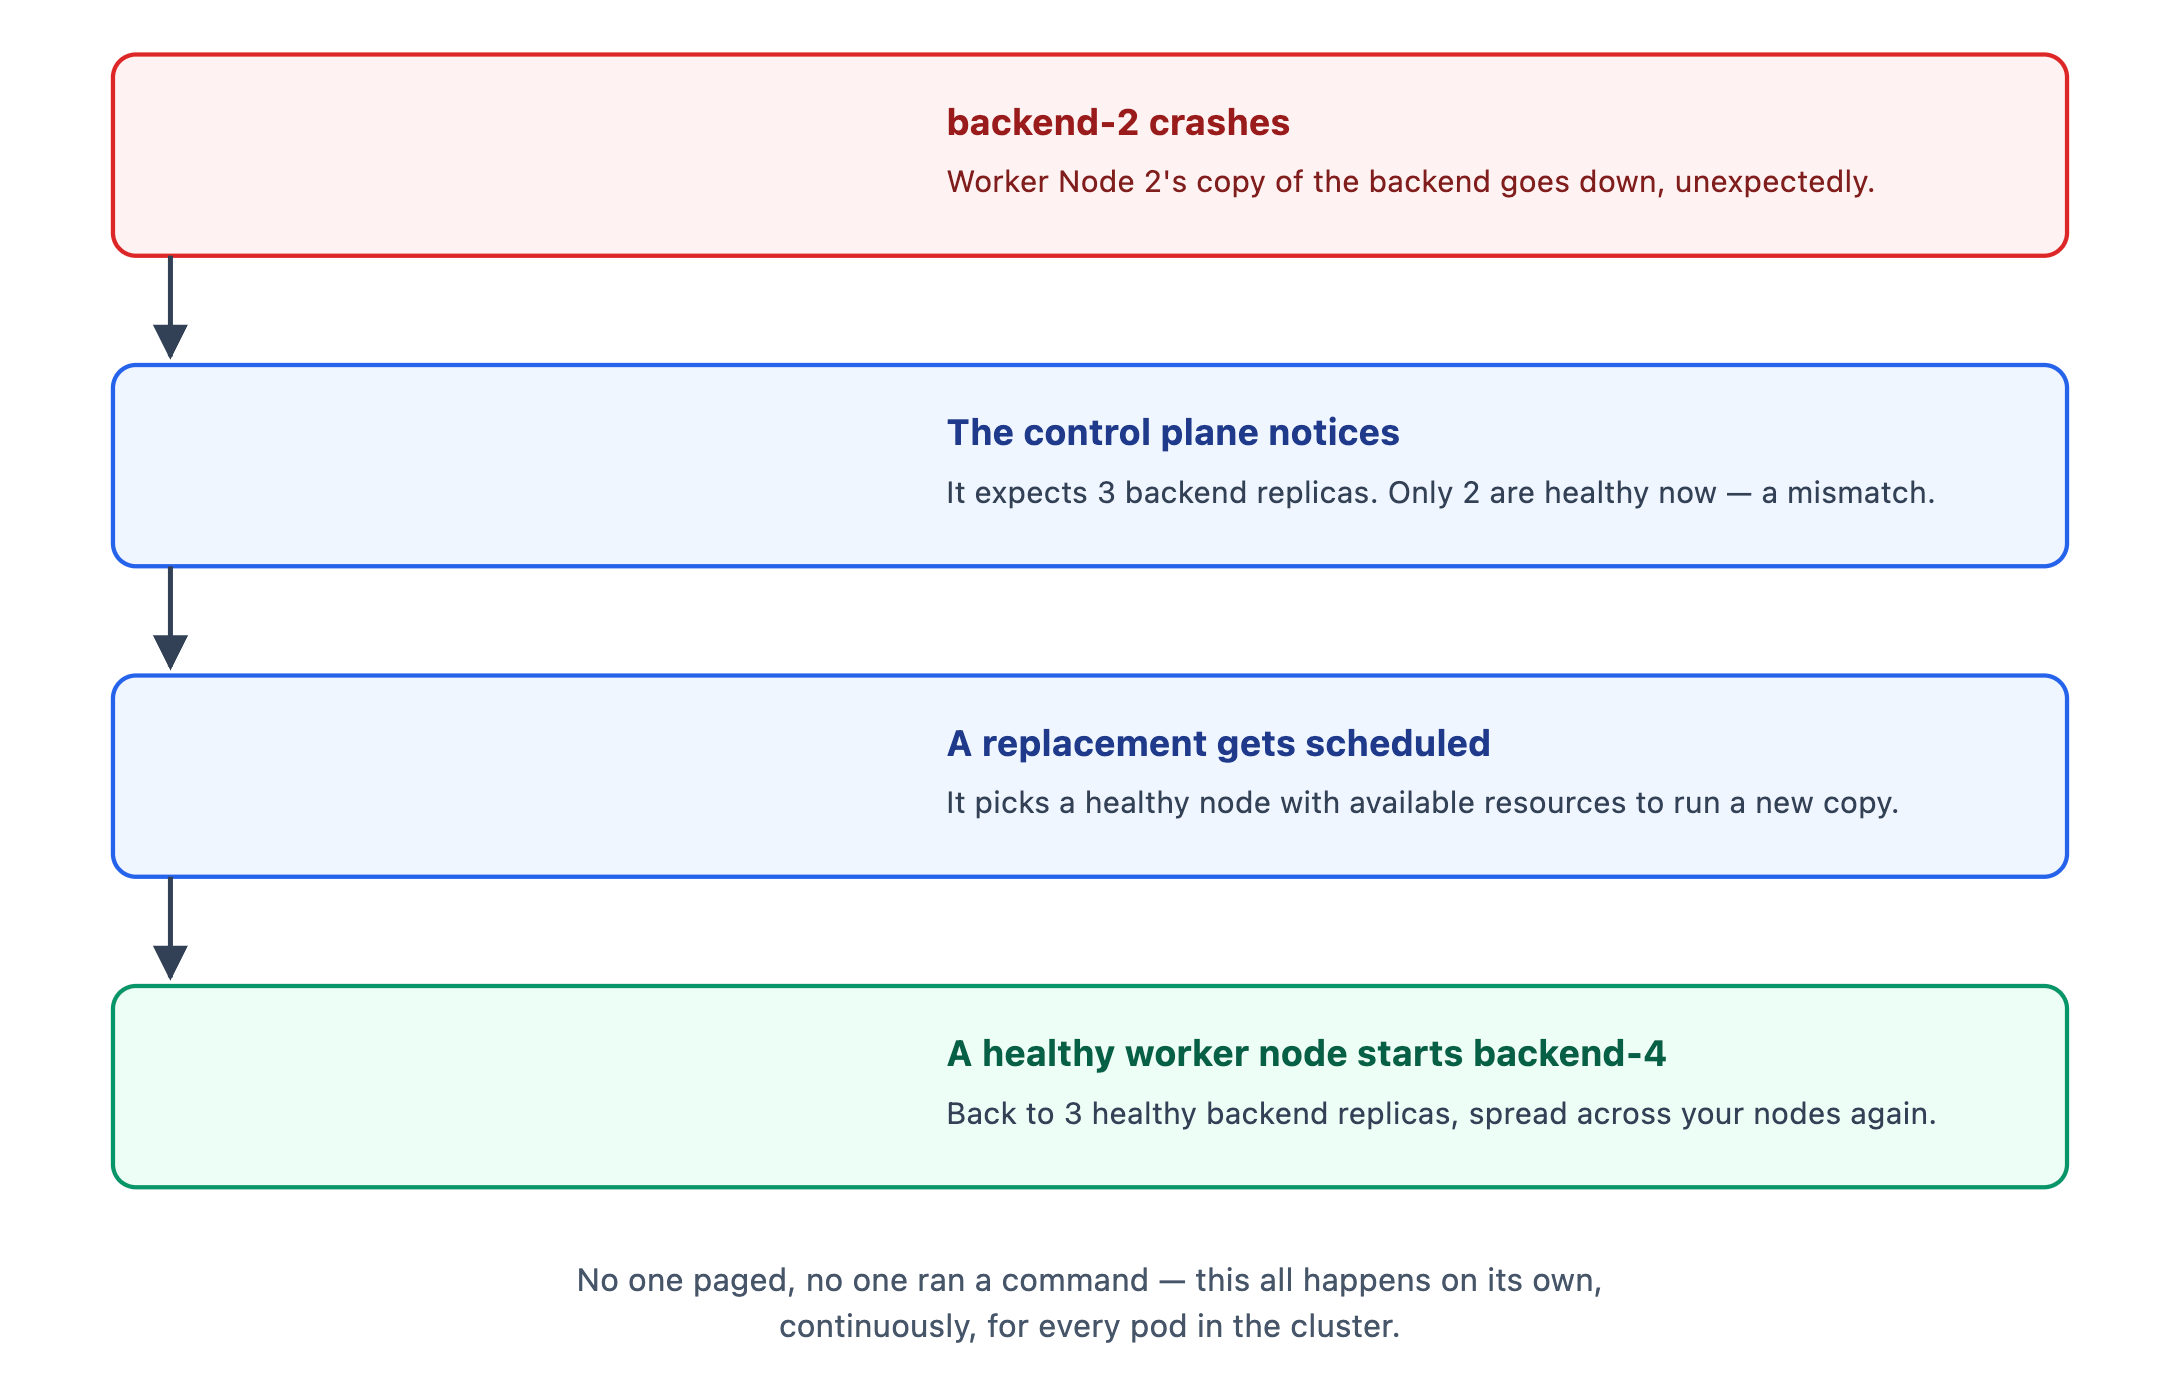
Nobody ran a command. The control plane is constantly comparing "3 backend replicas requested" against "how many are actually healthy right now", and the moment those numbers disagree, it acts: it creates a new pod and schedules it onto any healthy node with available CPU and memory. Within seconds, the application is back to 3 healthy backend replicas, and nobody had to be paged.
This is the same idea whether one pod crashes, an entire node goes offline, or you deploy a new version: Kubernetes is always reconciling desired state against actual state, automatically. Exactly which components do this reconciling, and how, is what the rest of this series is about.
Trying It Yourself
The best way to understand how all of this fits together is to try it yourself. With K3s, you can go from zero to a working cluster and deploy an application in under five minutes. Since K3s requires a Linux kernel under the hood, you can run it natively on Linux, inside a lightweight VM on macOS, or via WSL2 on Windows.
On Linux
One command gets you a working single-node cluster, control plane and worker node both, on this one machine:
curl -sfL https://get.k3s.io | sh -
K3s bundles its own kubectl, so there's nothing else to install to poke at it:
sudo k3s kubectl get nodes
On macOS
macOS doesn't have the Linux kernel features K3s needs (cgroups, iptables, and so on), so you run it inside a lightweight Linux VM instead. Multipass is the easiest way to get one:
brew install --cask multipass
multipass launch --name k3s-vm --cpus 2 --memory 4G --disk 20G
multipass shell k3s-vm
That last command drops you into a shell inside the VM. From here it's the exact same quickstart as Linux:
curl -sfL https://get.k3s.io | sh -
sudo k3s kubectl get nodes
A couple of commands are worth knowing while you're in there. systemctl status k3s confirms the service is running, and journalctl -u k3s -f streams its live logs, the apiserver, scheduler, controller-manager, and everything else covered in part two, since they're all one process:
sudo systemctl status k3s
sudo journalctl -u k3s -f
If you'd rather run kubectl from your Mac's own terminal instead of staying inside multipass shell, pull the kubeconfig out into its own file and point at it explicitly. That way it never touches or overwrites anything already sitting in ~/.kube/config, handy if you also use kubectl against a real cluster somewhere:
export KUBECONFIG=~/k3s-local.yaml  # only affects this terminal session
kubectl get nodes
Open a fresh tab and kubectl there still points at your normal, default kubeconfig, completely unaffected.
On Windows
Windows doesn't run a Linux kernel natively either, but Windows Subsystem for Linux (WSL2) provides a real, lightweight Linux environment managed directly by Windows. In PowerShell or Windows Terminal, install WSL if you haven't already:
wsl --install
Once inside your WSL distribution (like Ubuntu), make sure systemd is enabled in /etc/wsl.conf (enabled by default on modern WSL2), then run the same quickstart command:
curl -sfL https://get.k3s.io | sh -
sudo k3s kubectl get nodes
Deploying, Scaling, and Killing a Pod for Real
Let's reproduce the scaling and self-healing scenarios from earlier in this post, for real, using a small public image with an actual web page so you can watch it happen in a browser. Call the deployment docker-web:
kubectl create deployment docker-web --image=docker/getting-started --replicas=3
This is the apiserver write from part two's example: you're telling the control plane "run 3 Pods using this image." The controller-manager and scheduler take it from there.
kubectl rollout status deployment/docker-web
Blocks until all 3 replicas are actually up and healthy, instead of you guessing when it's safe to move on.
kubectl expose deployment docker-web --port=80 --target-port=80 --type=NodePort
Creates a Service. --port=80 is the port the Service itself listens on internally; --target-port=80 is the port on the actual container to forward to (matches the image's EXPOSE 80); --type=NodePort additionally opens a random high port on every node so something outside the cluster, your browser, can reach it.
kubectl get svc docker-web
# NAME         TYPE       CLUSTER-IP     EXTERNAL-IP   PORT(S)        AGE
# docker-web   NodePort   10.43.196.19   <none>        80:31900/TCP   12s
Look at the PORT(S) column: 80:XXXXX/TCP. That XXXXX, 31900 in this example, is the NodePort kube-proxy picked; yours will be a different number. If you're on macOS and used Multipass, get the VM's IP with:
multipass info k3s-vm | grep IPv4
# IPv4:           192.168.252.2
Then open http://<that-IP>:<nodeport> in a browser, for example http://192.168.252.2:31900 (on Linux or Windows via WSL2, localhost:<nodeport> works directly) and you should see Docker's getting-started page.
Now scale it exactly like the apiserver example in part two:
kubectl scale deployment docker-web --replicas=5
Same mechanism as before, just replicas: 3 becomes replicas: 5. Two new Pods get created and scheduled.
kubectl get pods -o wide
-o wide adds the columns plain get pods hides: which node each pod landed on, and its internal pod IP.
Now kill one, to watch the self-healing sequence from the diagram above happen for real. In one terminal:
kubectl get pods -w
-w watches: instead of printing once and exiting, it stays open and streams every status change live.
In a second terminal, delete one of the pods from that list:
kubectl delete pod <pod-name>
Kubernetes doesn't distinguish "you deleted it" from "it crashed." Either way, the running count no longer matches the desired count, so the ReplicaSet controller notices and creates a replacement.
Watch the first terminal: the pod goes Terminating, and a replacement appears and reaches Running within a couple of seconds. On a single-node sandbox like this it always lands back on the same node, but the mechanism (the control plane noticing the mismatch and scheduling a replacement) is identical to a real multi-node cluster.
Clean up when you're done:
kubectl delete deployment docker-web
kubectl delete svc docker-web
or tear down the whole VM with multipass delete k3s-vm && multipass purge.
What's Next
You now know why Kubernetes exists, what it is, and what a real cluster running an application actually looks like, including what happens when something breaks. The two posts that follow go deep on how it's built:
- Part two covers every control-plane component in K3s: the apiserver, the datastore (etcd, kine, and SQLite), the scheduler, the controller-manager, cloud-controller-manager, and K3s's tunnel server, plus how high availability works.
- Part three covers every worker-node component: kubelet, kube-proxy, containerd, and flannel, the packaged add-ons, and a complete trace of a Deployment from
kubectl applyto running containers.
References & Further Reading
- K3s Official Documentation: Architecture overview, quickstart guides, and networking configuration.
- Kubernetes Concepts Documentation: Official upstream guides to pods, services, nodes, and control-plane architecture.
- CNCF Conformance Program: The Cloud Native Computing Foundation specification ensuring Kubernetes interoperability.
- Kine: Kine Is Not Etcd: The translation layer that allows K3s to use SQLite, PostgreSQL, and MySQL instead of etcd.
- Multipass: Canonical’s lightweight Ubuntu VM engine for macOS and Windows.
- Windows Subsystem for Linux (WSL): Microsoft’s official guide to running Linux environments on Windows.